Investing into a Liquidity Pool
This guide will teach you how to find the correct liquidity pool instance to invest in, how to invest and get the respective tranche tokens in return, and how the whole system flows behind the scenes.
Deployed Contracts
Pick the contracts deployed on the network you want to invest from.
You will need them on the Step 2. below.
- Ethereum
PoolManager-0x78E9e622A57f70F1E0Ec652A4931E4e278e58142Circle USDC-0xA0b86991c6218b36c1d19D4a2e9Eb0cE3606eB48
Steps
-
ERC20 Approval
The user should call the ERC20 approval on the investment currency (e.g. USDC on Ethereum) to allow the Liquidity Pools contract to manage those funds for them
-
Pick the correct
LiquidityPoolinstanceWith the appropriate
PoolManagercontract instance, call the following:PoolManager.getLiquidityPool(poolId, trancheId, currency)NOTES:
-
Invest into a LiquidityPool
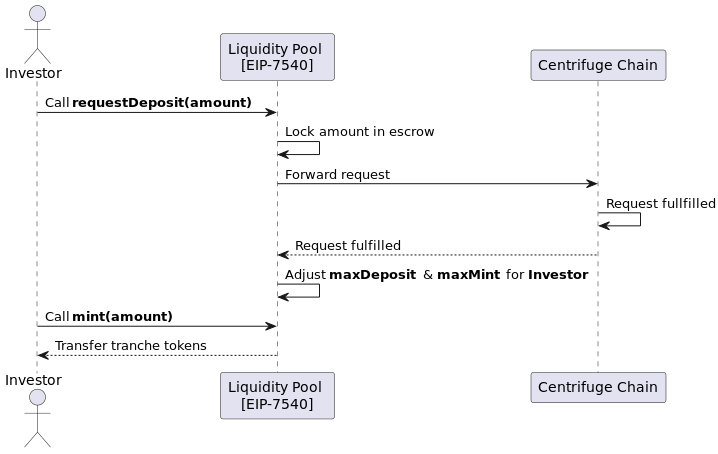
Now that you have the LiquidityPool instance at hand, you can invest into it by calling:
LiquidityPool.requestDeposit(uint256 amount, address receiver)Once submitted, the
amountis locked on the escrow contract.Then, the pool issuer needs to fulfill this request.
Once that's done, yield starts to accrue immediately and the user can claim their tranche tokens.
-
Claim the tranche tokens
Once the request from step 3. is fulfilled, the user can claim their tranche tokens equivalent to
yby calling:LiquidityPool.mint(uint256 y, address receiver)NOTE:
yneeds to be ≤maxDeposit. The user can find that amount by callingLiquidityPool.maxDeposit.
Overview
Behind the scenes, this is what takes place on steps 2 and 3: